MANUAL

CubicSecure
Smart automatic water shut-off valve

INTRODUCTION
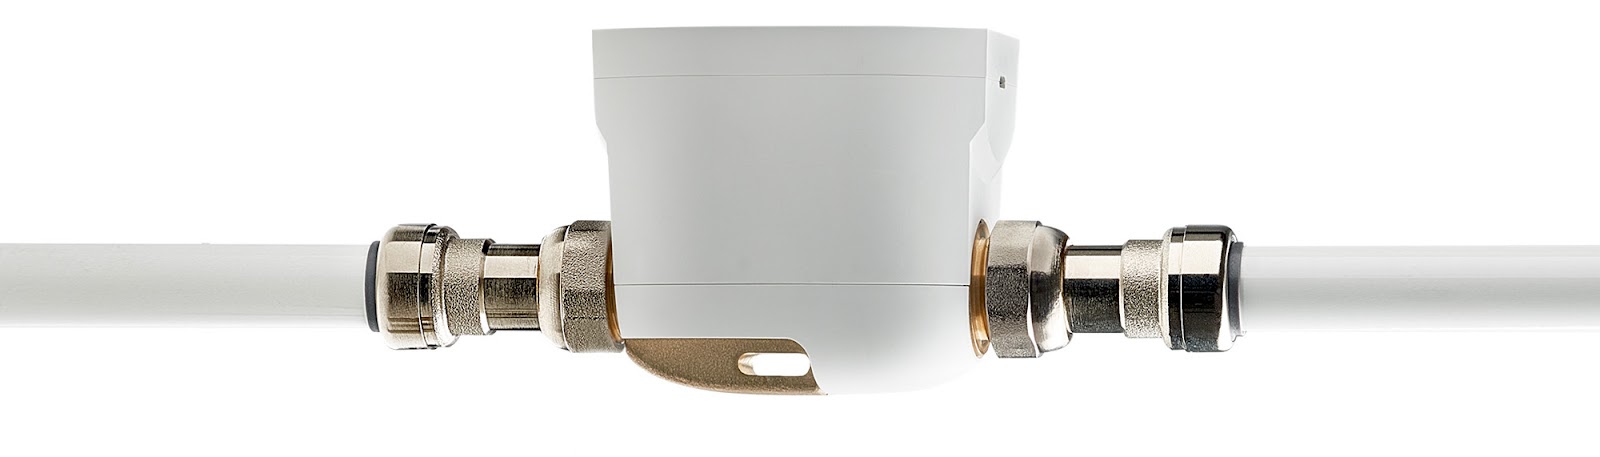
CubicSecure measures your water flow in real time and detects water leaks immediately. The CubicSecure protects your home from damage caused by micro-leaks and broken water pipes. The compact design makes CubicSecure easy to install and fits in water cabinets.
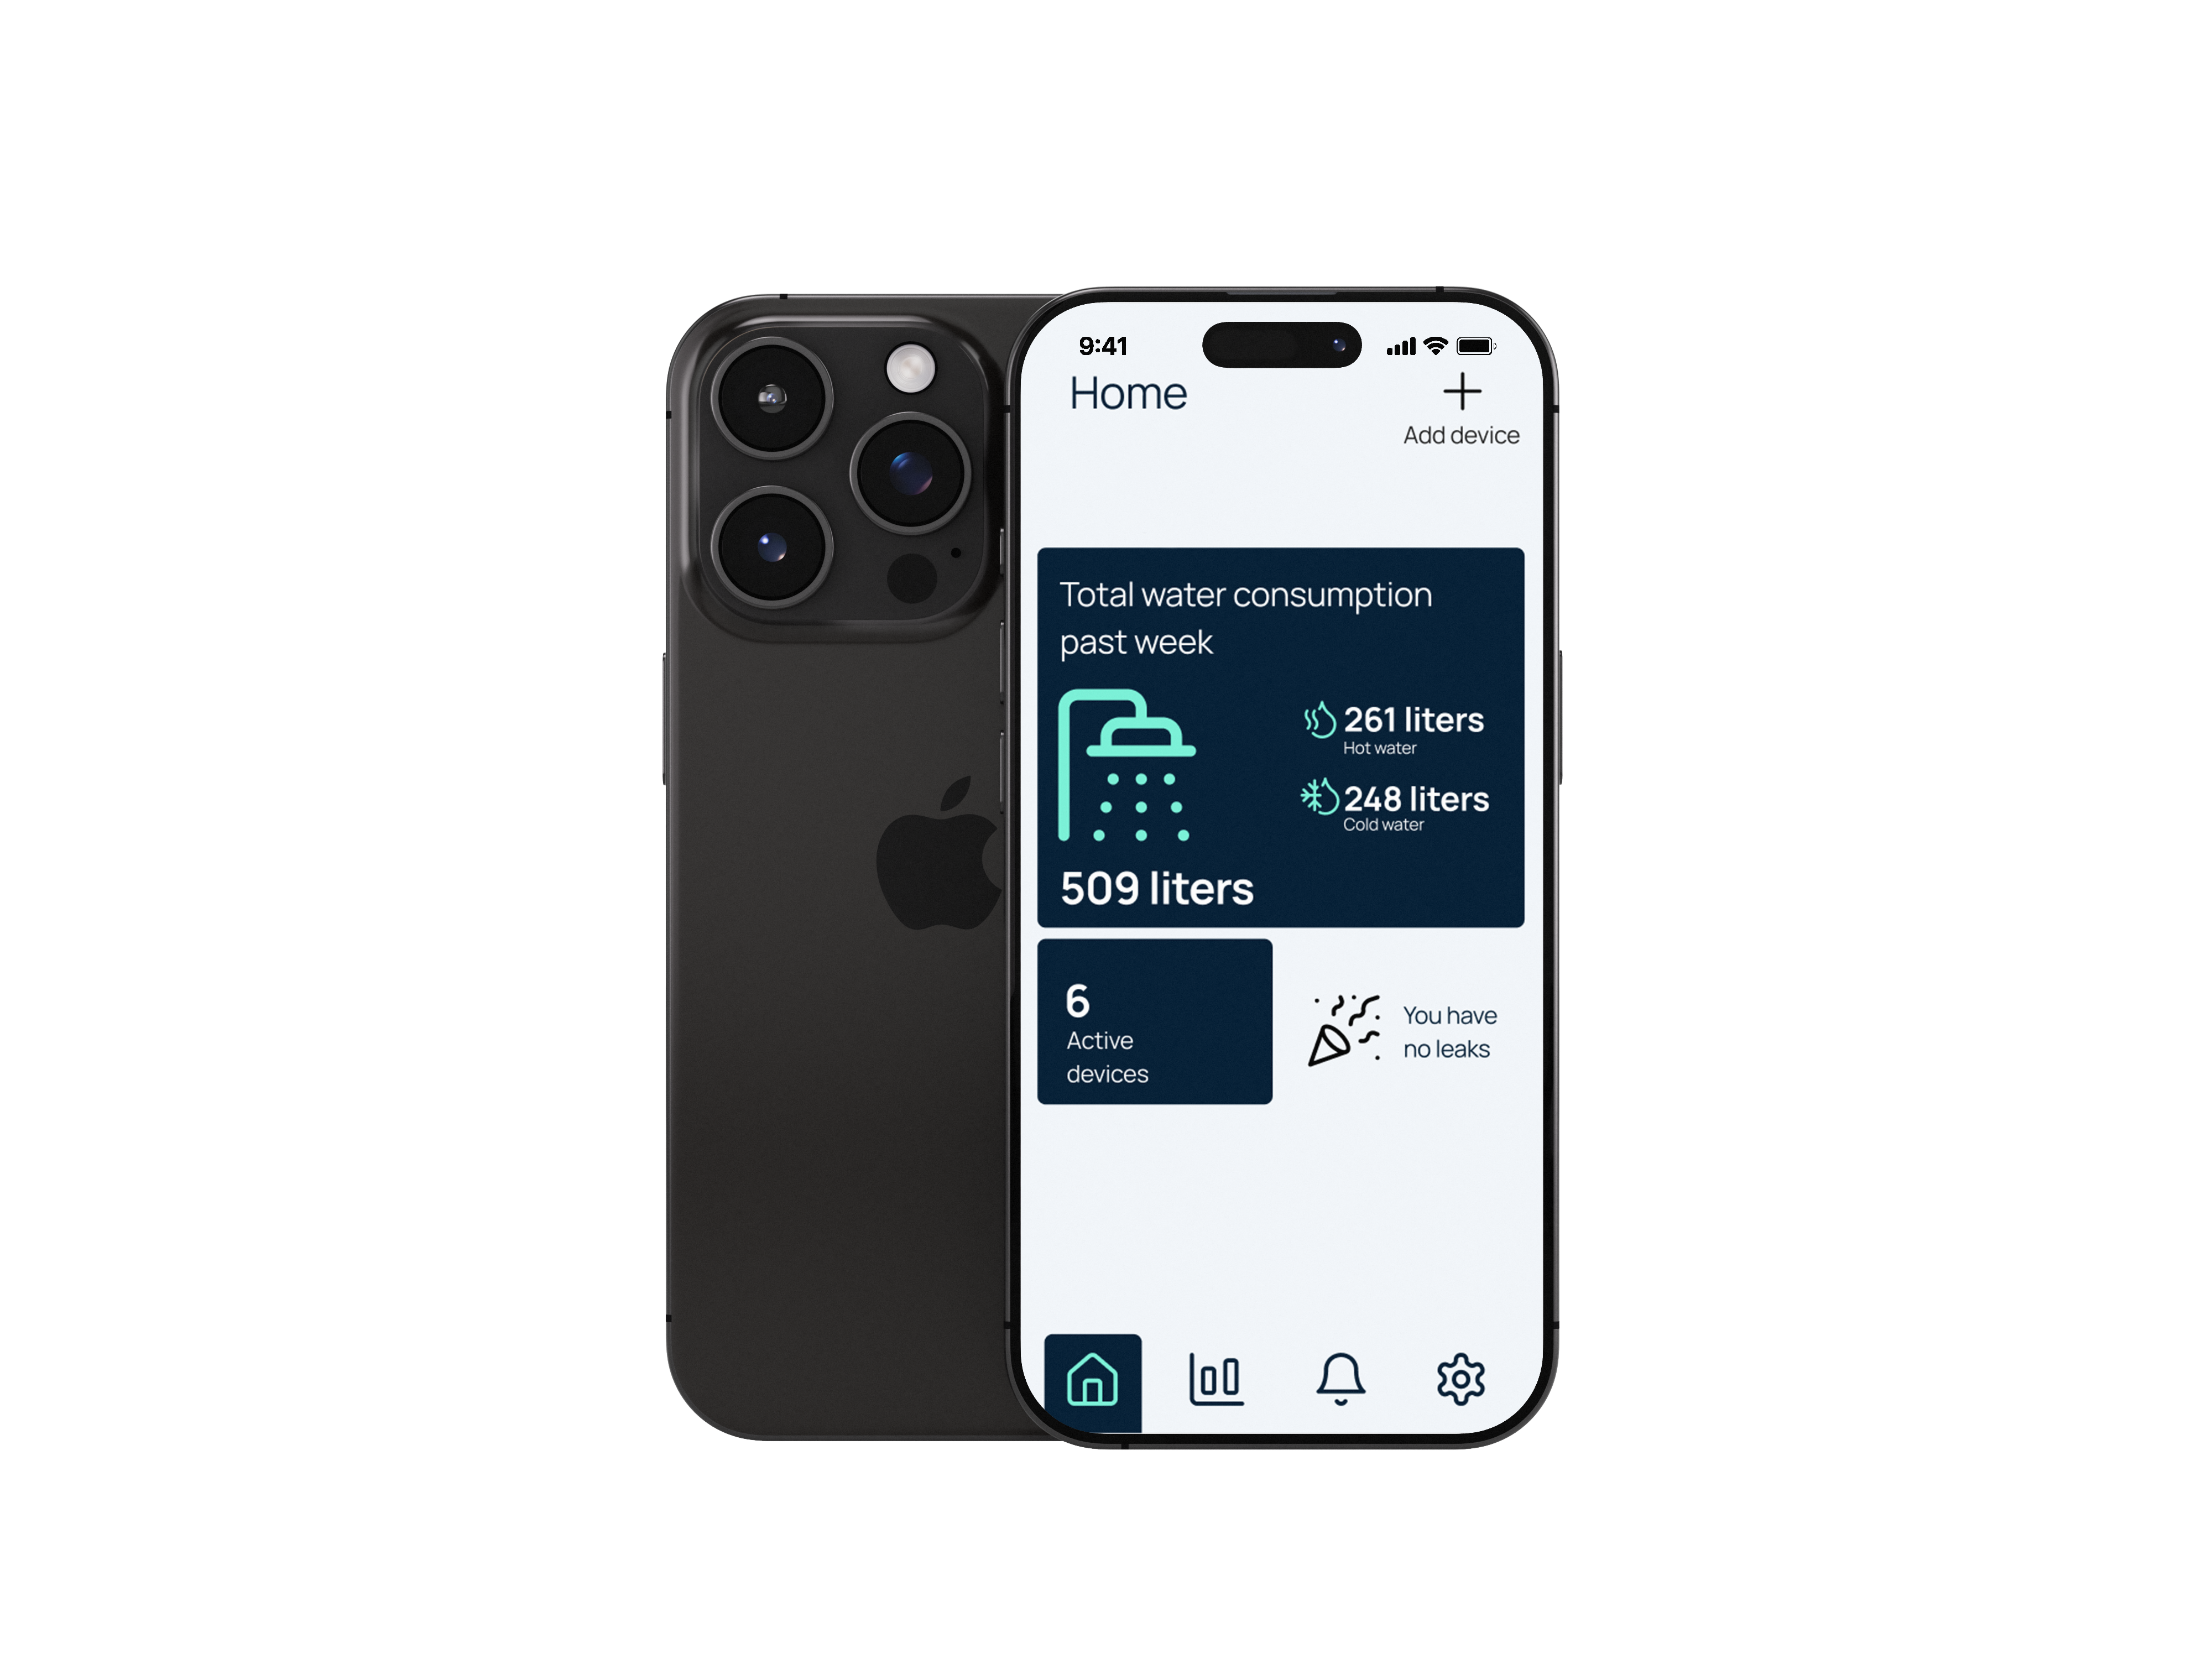
CubicSecure works completely on its own and does not need any connection to the internet. If, on the other hand, you want to receive notifications about alarms and the opportunity to see your individual water consumption, the product needs to be connected to Wi-Fi. When the device is connected, you can control CubicSecure remotely through our app.
INSTALLATION INFORMATION
CubicSecure is a small device that is easy to install in tight spaces. The device is easily mounted on main incoming water pipes in a villa or apartment. The device is equipped with a knob for manual ball-valve override in the event of a power failure or emergency.
PACKAGE CONTENTS
1x CubicSecure
1x Mains adapter
2x Plane Adapter (LK RSK-1870678)
ARTICLE NUMBER (MODEL VERSION)
LTCS01
Important notice
Security systems such as residential sprinklers and emergency cooling of solid fuel boilers or similar must be connected before the device. If they are installed afterwards, they risk running out of water supply. |
Install the device after supplying security systems that require water. |
Water filters that are backwashed should be connected first so that their function is not disturbed. The system prevents water damage that may occur after the location of the device. |
When installing metal pipes in the distributor cabinet, the pipe must be provided with an electrical protective equalization (earthing) which must be installed by a qualified electrician if there is not already an earth screw in the cabinet. |
To avoid scalding in apartments, two CubicSecures can be paired. Pairing provides a synchronized automatic shut-off between the hot and cold water lines. |
DEVICE SETUP
⚠️ The CubicSecure must be installed by a plumber according to the Safe Water Installation industry regulations.
|
|
|
|
|
|
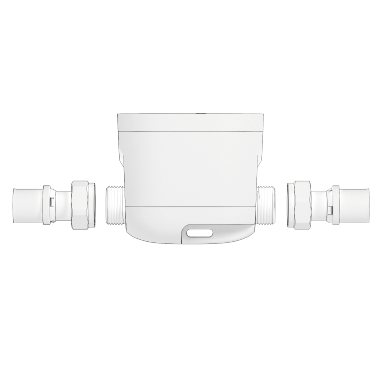
MOUNTING STEPS
Install the device on the incoming water line directly after the water meter’s shut-off valve and any non-return valve.
Tighten connections without damaging the plastic casing of the device.
If you have also purchased CubicDetectors, pair them with your CubicSecure through the Quandify app.
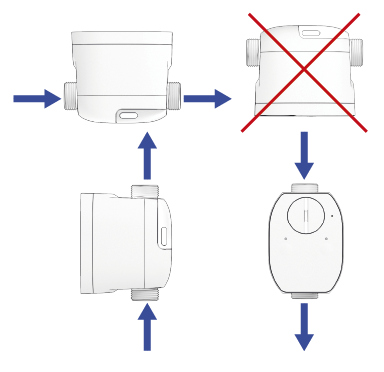
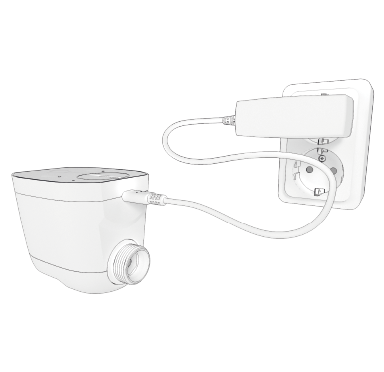
PHYSICAL SETUP
|
|
|
|
HOT/COLD WATER PAIRING
Install and start the CubicSecures. One for hot water and one for cold water.
Hold down the connect button for 5 seconds on the device installed for cold water. The connect LED starts flashing yellow and blue.
Hold down the connect button for 5 seconds on the device installed for hot water. The connect LED starts flashing yellow and red. You can also press once on connect to switch the hot/cold water designation.
Make sure that the connect LEDs on both devices flash green rapidly for about a second.
If pairing was not completed, redo process steps 2 to 4. To delete a pairing, perform a factory reset.
WI-FI SETUP
To be able to follow the device's measurements and alarms remotely via a smartphone, an app and a connection to a Wi-Fi network are required. Download the app.

Scan the QR-code to download the app.
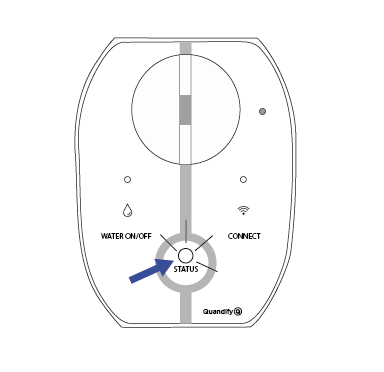
BUTTONS & INDICATIONS
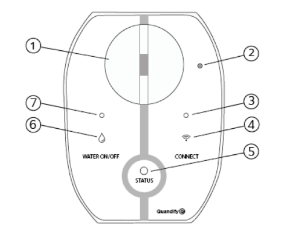
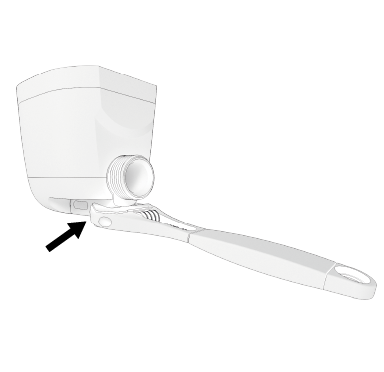
Manual valve switch
Factory reset button hole
Connect LED for pairing
Connect button for pairing
Status LED
On/off button for water
On/off LED for water
LED INDICATIONS
Status
LED | LED | MEANING | ACTION |
OFF | ⚫️ | The device is not powered. Make sure the device is connected to a power source. | Check that the power source is working properly. |
WHITE | ⚪️ | The device is switched on and working normally with no alarms. | - |
WHITE flashing | “⚪️” | The device is being updated and some functions are temporarily disabled. | Wait until finished. Do not disconnect the power source. |
YELLOW | 🟡 | Leak detection is deactivated OR water pressure is too low. | Press the WATER ON/OFF button to activate leak detection or check that the water system is working properly. |
YELLOW flashing | ”🟡” | Detected water leakage. | Check for leakages. |
GREEN flashing | “🟢” | The device is collecting micro-leakage data on the water pressure and has closed the valve in the meantime. | This process takes up to one minute, after which the device opens the valve again. |
RED | 🔴 | The device is not working properly. | Contact technical support. |
Water on/off
LED | LED | MEANING | ACTION |
OFF | ⚫️ | The valve is closed. The water supply/flow is off. | Turn on water supply by pressing WATER ON/OFF |
WHITE | ⚪️ | The valve is open. The water supply is on. | - |
WHITE flashing | “⚪️” | Indicates that there is an ongoing water flow where the frequency of the flashing indicates the amount of flow rate. | - |
YELLOW | 🟡 | The position of the valve has been changed using the manual knob. | Press the WATER ON/OFF button to correct the valve position. |
RED | 🔴 | The water pressure is very low or there are air bubbles or no water in the pipe. | Check that the water system is working properly. |
Connect
LED | LED | MEANING | ACTION |
OFF | ⚫️ | Wi-Fi off and not configured. | - |
WHITE | ⚪️ | Wi-Fi configured and connected to the cloud. | - |
WHITE flashing | “⚪️” | The device is in hotspot mode for Wi-Fi configuration using the app. | - |
YELLOW flashing | “🟡” | Ongoing pairing establishment between two CubicSecures, one for cold water and one for hot water. | - |
YELLOW/BLUE flashing | “🟡” “🔵” | Pairing completed between the hot and cold water devices. The connection is made from the cold water device which flashes YELLOW/ BLUE. | - |
YELLOW/RED flashing | “🟡” “🔴” | Pairing completed between the hot and cold water devices. The connection is made from the hot water device which flashes YELLOW/RED. | - |
GREEN flashing | “🟢” | Hot/cold water pairing has been successful and is completed. | - |
RED flashing | “🔴” | No internet or cloud connection. | Check router firewall or redo app setup. |
LEAKAGE ALARMS
LEAKAGE TYPE | FLOW RATE [l/h] | DESCRIPTION |
Micro leakage | > 0.01 | Detected by the valve being automatically closed daily to measure a pressure drop above 0.5 bar for a maximum of 45 seconds. |
Medium leakage | > 6 | The device alarms and shuts off the water after a continuous flow for at least 45 minutes. |
Large leakage | > 1500 | The device alarms and closes the valve after a continuous flow over 1500 l/h for at least 90 seconds. |
NOTE: A larger leakage alarm will always override a smaller leakage detection. Above thresholds can be modified using the mobile application.
FUNCTION CHECK
WATER SHUT-OFF CHECK
Press the water ON/OFF button. The LED turns off when the ball valve has completely shut off the water flow.
Open a tap. Check that no water comes out of the tap. (Note that if the device is installed on the hot water pipe, cold water may still come out).
Press the WATER ON/OFF button. The LED shines WHITE when the valve is fully open. Check that water is now coming out of the open tap. During active waterflow the LED flashes WHITE.
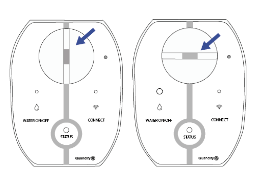
The picture on the left shows an open valve, a closed valve is shown on the right.
MICRO-LEAK DETECTION CHECK
Open a tap to simulate a very small leak. A dripping stream of water will suffice.
Press the water ON/OFF button to close the valve.
When the valve is closed, the status LED will flash green while the pressure sensor scans for small leaks for about 45 seconds.
If the pressure sensor manages to find a leak, the status LED starts flashing yellow. If the pressure sensor does not find a leak, redo the steps with a slightly larger leak.
Close the tap and press the water ON/ OFF button to open the valve again.
LEAKAGE DETECTION CHECK
Open a tap with the valve in the open position.
Leave the valve at full flow on the tap for at least 45 minutes.
Check that the device emits an alarm and switches off the flow after 45 minutes.
Then close the tap and reset the device.
ACKNOWLEDGE ALARMS
Press the water ON/OFF button once to acknowledge and turn off the alarm.
Press the water ON/OFF button again to open the valve.
NOTE: an acknowledgment resets all ongoing leak detections.
DISABLE LEAKAGE DETECTION
The leakage detection can be deactivated if a larger amount of water is needed to e.g. fill a pool or for irrigation. The preset time is 24 hours.
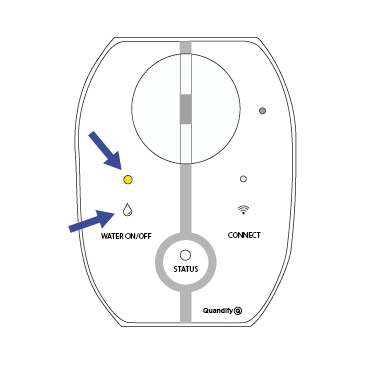
The deactivation of the alarm can be done in the app or manually by holding down the water ON/OFF button for 5 seconds. The LED will turn yellow when deactivated. Press again once to re-activate leak detection.
RESET WI-FI
If the connect LED is red or off:
Press the connect button once.
If the connect LED is white:
Restart the device using the power cable and press the connect button once the connect LED is red. This can also be done via the app.
FACTORY RESET
Unplug the power supply from the device.
Insert a paperclip into the hole on the reset button while plugging in the power cable for 3 seconds.
Wait for about three minutes. After about three minutes, the device has reset and the LEDs light up again.
NOTE: you will lose applied firmware updates and hot/cold pairings when doing a factory reset.
OPERATION
You can access the device data such as water usage, temperature, pressure, valve position and leakage status via the mobile app. When the device is powered on, it performs daily automatic leakage tests and exercises the ball-valve.
After a potential power failure, the device returns to the same mode it was in before the power failure.
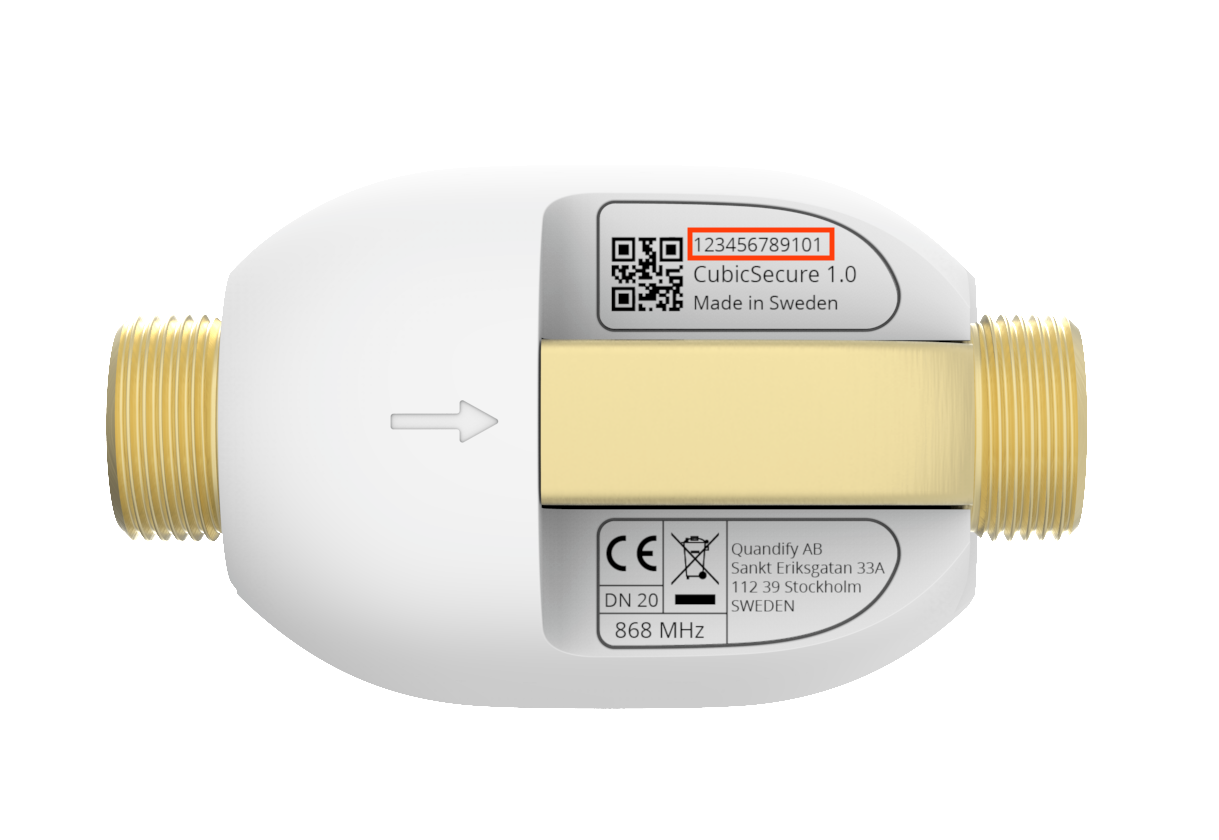
SERIAL NUMBER
You can find the 12 characters long serial number on the bottom of the CubicSecure. The data-matrix beside the serial number can also be used using barcode scanners.
DATASHEET
Area of use | Villa, terraced house, apartment |
Environment | Indoor (not waterproof) |
Pipe connection | G20 Eurocone external thread (DN20) |
Climate/environment | 5 °C - 30 °C |
Storage | -25 °C - 55 °C |
Wireless frequency | 2.4 GHz, (802.11bgn) |
Water temperature | Cold and hot water (0.1°C - 70°C) |
Pressure | PN10 |
Maximum pressure (15min) | 16 Bar |
Water flow during loss of water pressure, 1 bar (Kvs) | 4,6 m3/h |
Maximum flow rate | 4 000 l/h |
Start flow rate | 6 l/h |
Micro-leakage detected | >0.3 bar pressure loss (approx. 0,01 l/h) |
Medium sized leakage detected | >6 l/h for at least 45 minutes |
Large leakage detected | >1500 l/h for at least 90 seconds |
Weight | 720 grams |
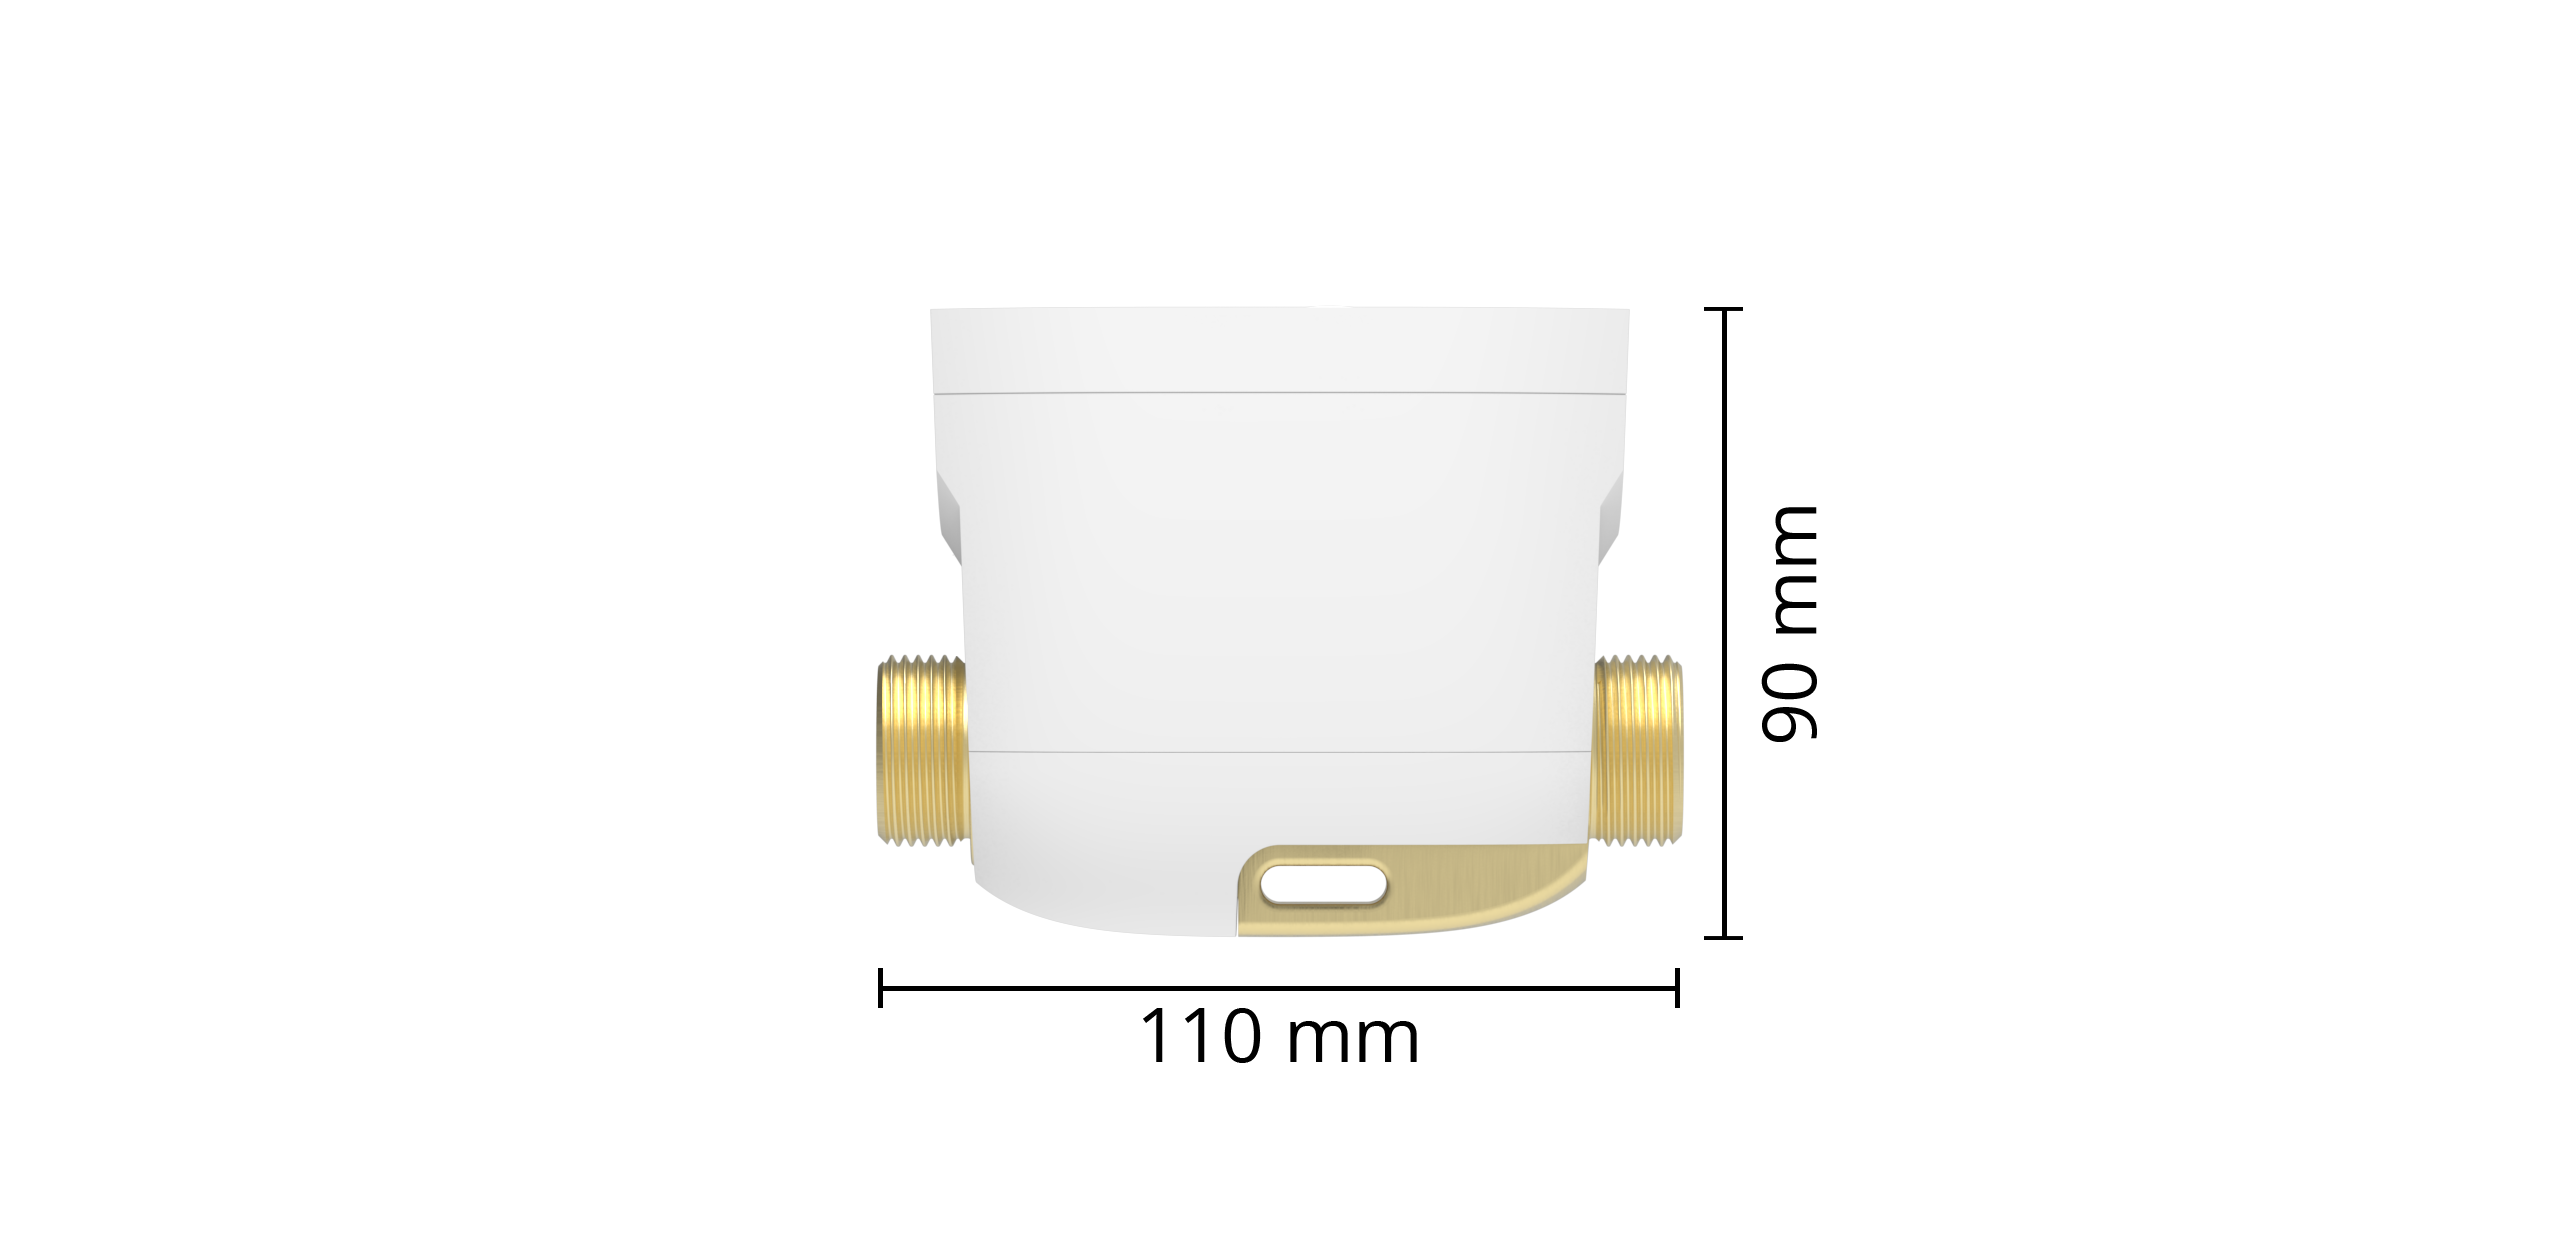
Dimensions | Height: 85, width: 71, length: 110 mm |
Power supply | 5VDC 2A Power supply, micro-USB cable (EU-plug), 1m cable |
Average device power usage | ~6 kWh/year (Wi-Fi on) |
Default transmission resolution | 1 hour (possible to request more frequently) |
Valve open/close time | ~10 seconds |
Flow rate accuracy | Max ±3% error |
Water temperature accuracy | Max ±2% error |
Water pressure accuracy | Max ±10% error |
MAINTENANCE, WARRANTY & SERVICE
If a device is faulty, please contact your authorized distributor for further assistance. All service must be performed by an authorized Quandify service center. If external parts need to be replaced, only original manufacturer spare parts should be used.
When the device has reached the end of its life, it should be sorted as electronics or other electronics and deposited with a recycling center.
If Quandify is responsible for a fault in the product, Quandify has the right to replace the product with either a new or repaired product. The liability period for replacement or repair of a product or spare part does not exceed the liability period for the original product. Quandify is not responsible for faults resulting from accidents, incorrect installation, liquid damage, incorrect care, abuse or other irregular use. Quandify is not responsible for any loss or damage caused by a non-functioning product. Its responsibility is strictly limited to the replacement of the product.
API
For advanced users, you can use the HTTP API to interact with the device without using the Quandify app.
For more information or support, go to https://support.quandify.com/en